Erecting a
"One Man Tower"
(this is
not a complete photo page so check back as more pics will be
added)
Firstly
some common sense tips about towers and erecting them
1. Always
wear an approved climbing harness with an attaching
lanyard.
2. Never
allow people to enter the area below where you are
working.
3. If
possible secure a line to the top of the structure in order to tie
yourself off while climbing.
4. Always
use a "utility bag" made of sturdy canvas to carry spanners and
hardware to the working position. On the OMT this can be attached to
the slide carriage where it can be easily accessed once you are in
position to bolt the sections together.
5. Always
wear an approved climbing harness with an attaching
lanyard.
And
finally ALWAYS WEAR AN APPROVED CLIMBING HARNESS WITH AN ATTACHING
LANYARD!
The OMT
was invented to make our hobby a safer place to enjoy - but you must
do your part - never be complacent about the dangers associated with
climbing any structure - a climbing harness only costs a couple of
hundred $$$ - a small price to pay when you consider the possible
alternatives.
 ----
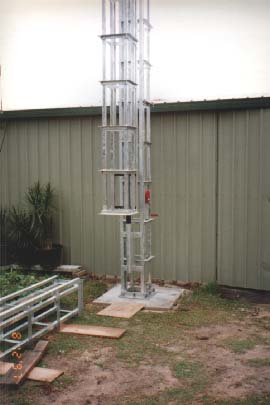
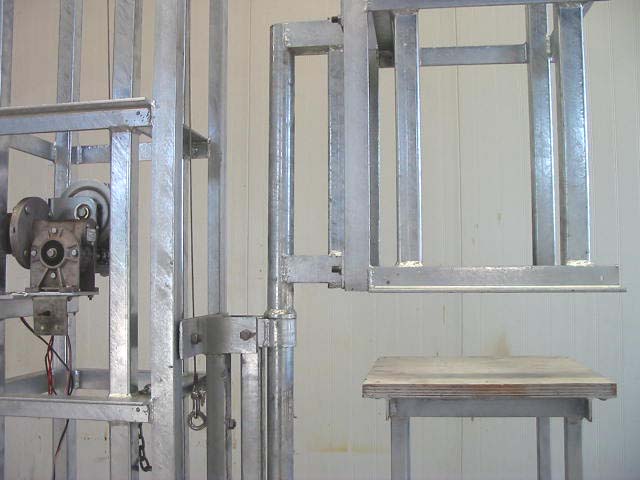
---- You've
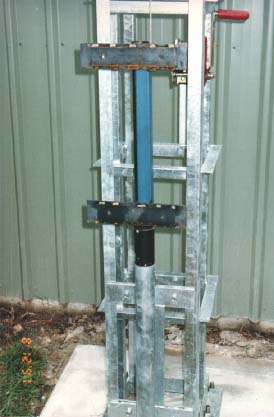
poured your base - stood the base section - fitted the winch/wire and
slide carriage - then you fit the "self erecting jig" to the slide
carriage (pictures show an older version of the slide carriage set
up)
You've
poured your base - stood the base section - fitted the winch/wire and
slide carriage - then you fit the "self erecting jig" to the slide
carriage (pictures show an older version of the slide carriage set
up)
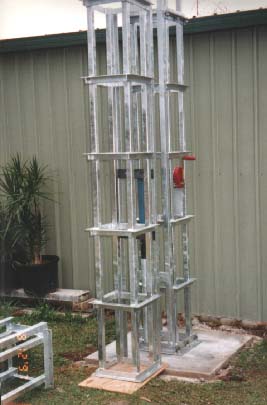 ---
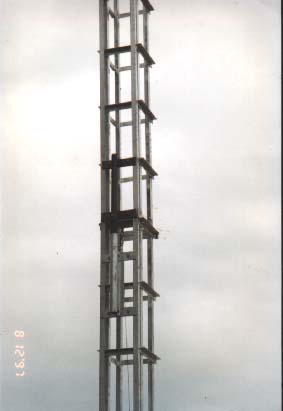
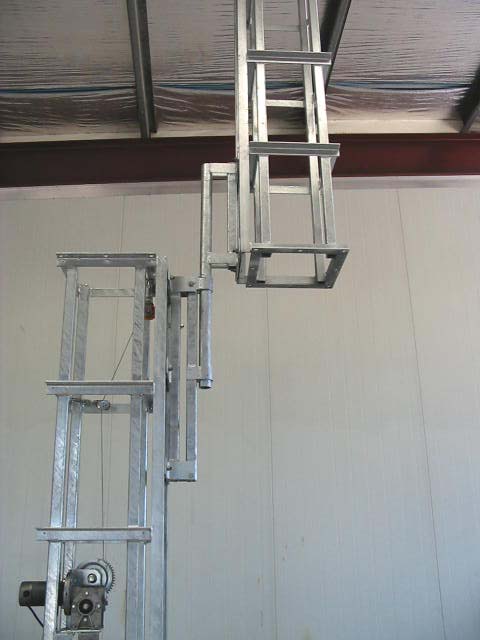
--- Now you
stand the next section (the winch can make this a very easy evolution
as the wire can be transferred to the section and winch it into
position) - the slide tracks are now clamped into the cheekplates of
the self erecting jig.
Now you
stand the next section (the winch can make this a very easy evolution
as the wire can be transferred to the section and winch it into
position) - the slide tracks are now clamped into the cheekplates of
the self erecting jig.
 ---
--- ---
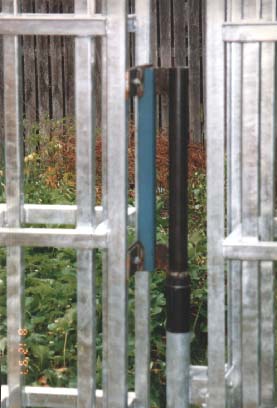
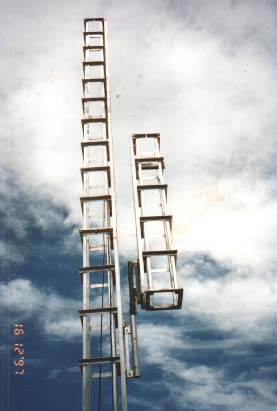
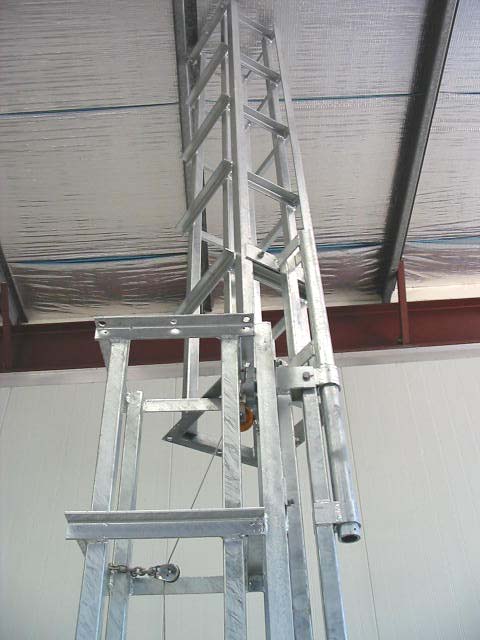
--- And away
it goes - the photos show a section in lift and once it has reached
the top of the standing tower it is simply swivelled over the top and
bolted in position.
The
cheekplates of the self erecting jig are released and the whole
carriage/jig assembly is lowered to attach the next
section.
And away
it goes - the photos show a section in lift and once it has reached
the top of the standing tower it is simply swivelled over the top and
bolted in position.
The
cheekplates of the self erecting jig are released and the whole
carriage/jig assembly is lowered to attach the next
section.
 ---
---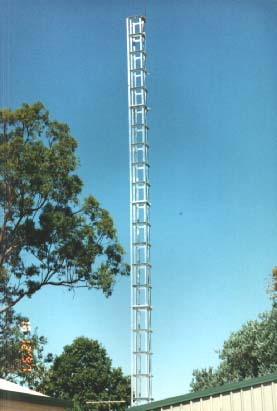 The pulley
that is attached to the top of the sections must be transferred each
section - and you repeat the exercise until your tower is erected.
One person can easily erect a 15m tower - fit their antenna and be on
air in one day. (Well....one normally active and motivated person
that is - of course there will always be those among us who would not
be able to erect a sand castle on a beach with a bucket.)
The pulley
that is attached to the top of the sections must be transferred each
section - and you repeat the exercise until your tower is erected.
One person can easily erect a 15m tower - fit their antenna and be on
air in one day. (Well....one normally active and motivated person
that is - of course there will always be those among us who would not
be able to erect a sand castle on a beach with a bucket.)
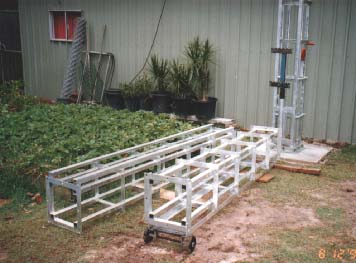
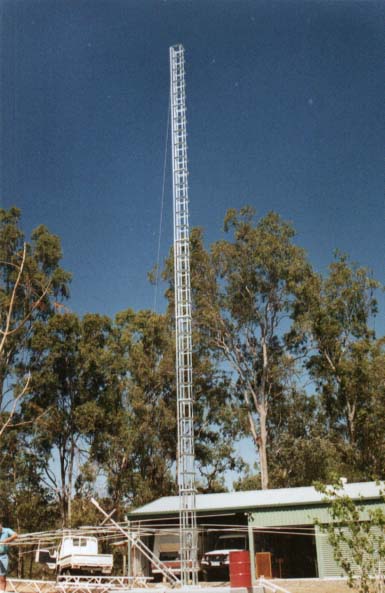
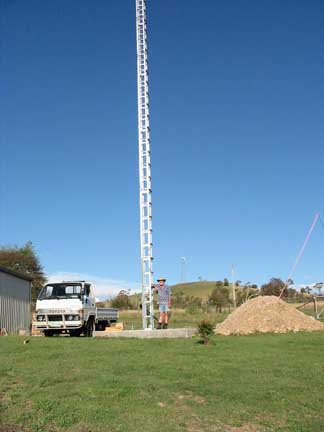
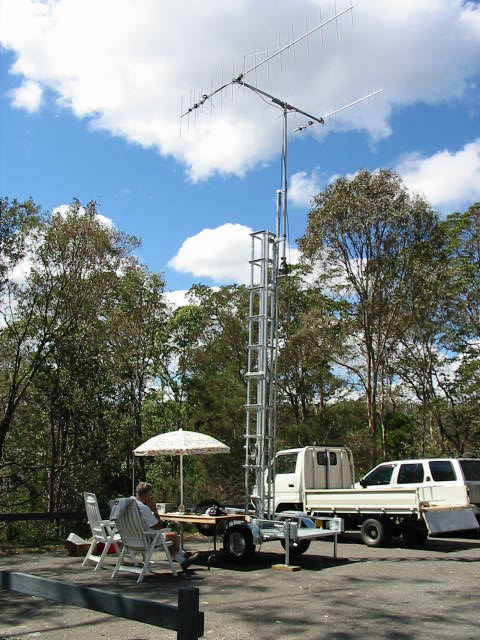
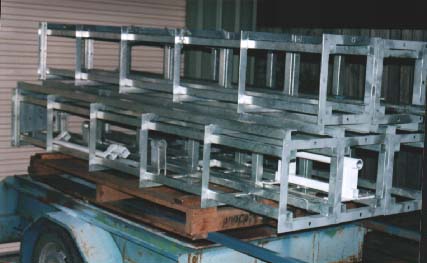 This gives
an idea of the portable nature of the towers - remember this is a
complete 15m FREE STANDING HEAVY DUTY TOWER - and it is shown here on
a pallet as it was being prepared for transport overseas. The 15m One
Man Tower far exceeds the Australian Wind Code (AS1170.2) and was
tested by Facet Engineering Consultants using the standards as laid
down under AS 4100 for steel structures.
This gives
an idea of the portable nature of the towers - remember this is a
complete 15m FREE STANDING HEAVY DUTY TOWER - and it is shown here on
a pallet as it was being prepared for transport overseas. The 15m One
Man Tower far exceeds the Australian Wind Code (AS1170.2) and was
tested by Facet Engineering Consultants using the standards as laid
down under AS 4100 for steel structures.
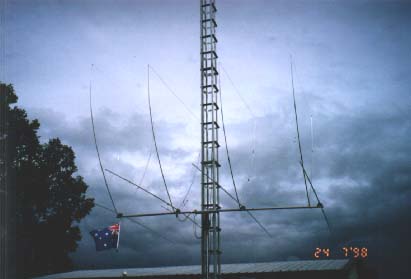 ---
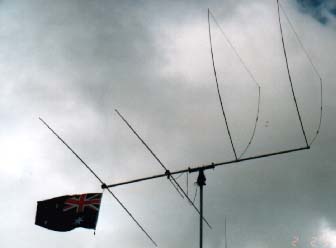
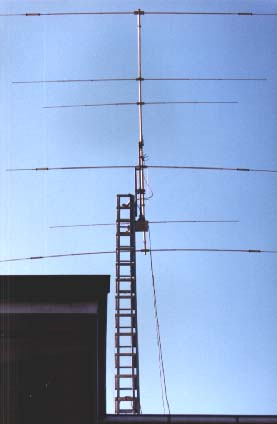
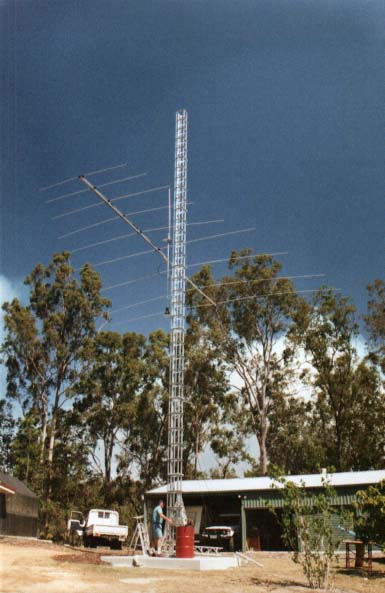
---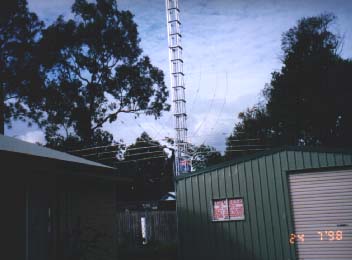 Here is a
graphic example of what it is all about - SAFETY, SAFETY AND MORE
SAFETY!!! - a storm is brewing - within a couple of minutes the whole
top 2.5m of the tower including the antenna array is brought close to
the ground out of the most destructive wind forces and the
instalation becomes nothing more than a 12.5m tower - less windload
area presented to the howling wind and a far safer way to have any
antenna instalation.
Here is a
graphic example of what it is all about - SAFETY, SAFETY AND MORE
SAFETY!!! - a storm is brewing - within a couple of minutes the whole
top 2.5m of the tower including the antenna array is brought close to
the ground out of the most destructive wind forces and the
instalation becomes nothing more than a 12.5m tower - less windload
area presented to the howling wind and a far safer way to have any
antenna instalation.
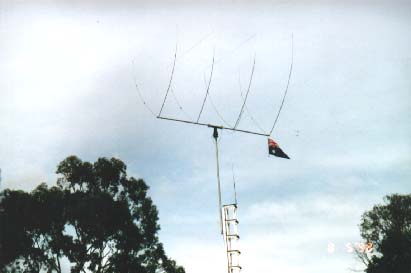 ---
---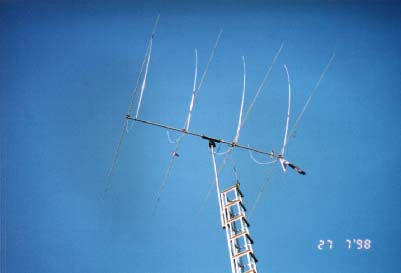 Here is a
4 el Delta loop for 10m on the left and on the right is an 8 el duo -
bander with 4 el delta on 10m and 4 el Yagi on 15m
The next
thing is to consider just how easy it is to install and make
adjustments to any antenna array - but consider just what is involved
with very large and very awkward antenna arrays - with any other sort
of tower you are faced with considerable difficulty fitting or
adjusting - with the One Man Tower every experimenters dreams are
fulfilled. You install and make adjustments with your feet planted
firmly on the ground - no need to have a large, clear space to tilt
over the tower - no guys to worry about - and no expensive
"Cherrypicker" hire cost to worry about. No longer do you have to
prevail on the good nature of your friends or family - no longer do
you have to put peoples lives at risk - your One Man Tower gives you
complete control.
EASILY AND
SAFELY!!!
Here is a
4 el Delta loop for 10m on the left and on the right is an 8 el duo -
bander with 4 el delta on 10m and 4 el Yagi on 15m
The next
thing is to consider just how easy it is to install and make
adjustments to any antenna array - but consider just what is involved
with very large and very awkward antenna arrays - with any other sort
of tower you are faced with considerable difficulty fitting or
adjusting - with the One Man Tower every experimenters dreams are
fulfilled. You install and make adjustments with your feet planted
firmly on the ground - no need to have a large, clear space to tilt
over the tower - no guys to worry about - and no expensive
"Cherrypicker" hire cost to worry about. No longer do you have to
prevail on the good nature of your friends or family - no longer do
you have to put peoples lives at risk - your One Man Tower gives you
complete control.
EASILY AND
SAFELY!!!
 ---
---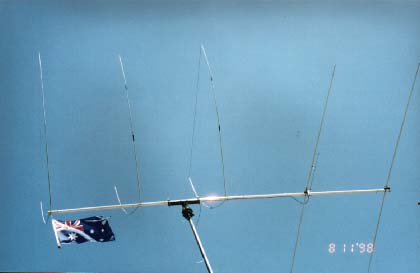 A 4 el
Yelta (Yagi/Delta loop hybrid) and a 5 el version - these antennae
were a real enigma - and serious testing is still under way on them -
these babies PERFORM big.
A 4 el
Yelta (Yagi/Delta loop hybrid) and a 5 el version - these antennae
were a real enigma - and serious testing is still under way on them -
these babies PERFORM big.
 ---
---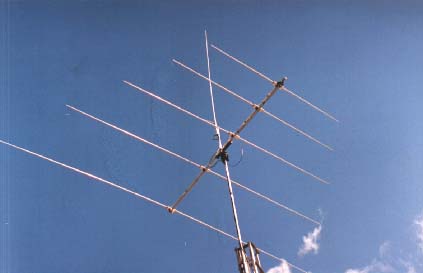 The
AEI/OMT "Foundation Special" - a 5el Log Periodic that works superbly
for 10m and 15m - then shown with a duo-band Diamond 520N mounted
above it to give one fantastic "Foundation Licence" station antenna
set up. These LPDA arrays also work well on the 27MHz.
band.
The
AEI/OMT "Foundation Special" - a 5el Log Periodic that works superbly
for 10m and 15m - then shown with a duo-band Diamond 520N mounted
above it to give one fantastic "Foundation Licence" station antenna
set up. These LPDA arrays also work well on the 27MHz.
band.
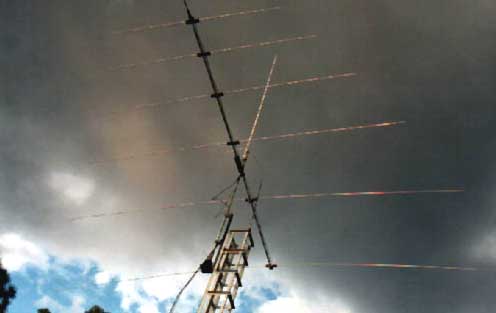 Adding the
6th element gave working range down to 13MHz. Not the clearest of
shots but it was very dark with a storm approaching. An ideal
situation for the Foundation Licencee who upgrades to Standard or
Advanced licence - simply add the extra boom length and add the 6th
element and phase harness to give the frequency range to
13MHz.
Adding the
6th element gave working range down to 13MHz. Not the clearest of
shots but it was very dark with a storm approaching. An ideal
situation for the Foundation Licencee who upgrades to Standard or
Advanced licence - simply add the extra boom length and add the 6th
element and phase harness to give the frequency range to
13MHz.
 ---
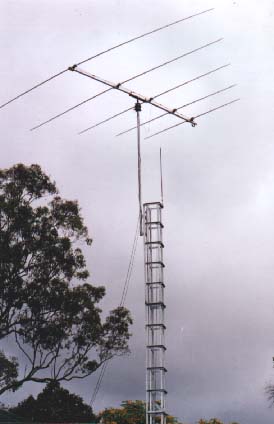
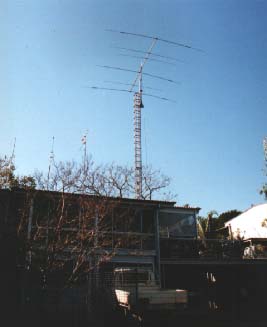
--- Now a
couple of shots of VK4CWT (Harris) antenna arrays - on his 20m tower.
I think Harris might sing some words of praise for the ease with
which he can now install and adjust his antenna arrays
Now a
couple of shots of VK4CWT (Harris) antenna arrays - on his 20m tower.
I think Harris might sing some words of praise for the ease with
which he can now install and adjust his antenna arrays
 ---
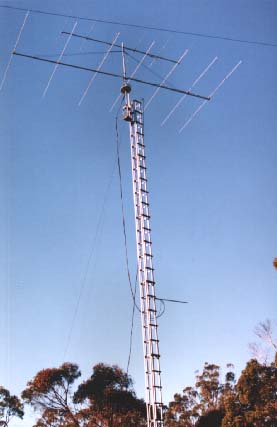
--- And the
1986 instalation at VK4FM (Alan) - a difficult site but the OMT
fitted right in and gave Alan a new dimension for his
hobby.
Many of us
have worked this terrific contributor to our hobby over the years and
I for one hope to work him for many years to come.
And the
1986 instalation at VK4FM (Alan) - a difficult site but the OMT
fitted right in and gave Alan a new dimension for his
hobby.
Many of us
have worked this terrific contributor to our hobby over the years and
I for one hope to work him for many years to come.
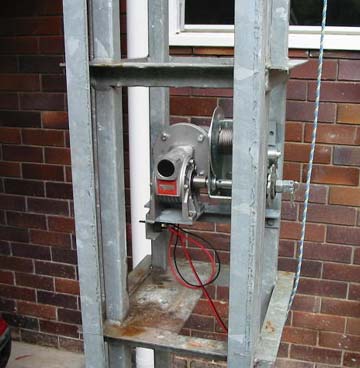 And as of
17th Oct. 2003 Alan has moved into the "luxury" bracket - the manual
winch was removed and replaced with one of the fantastic little 12v
DC motorised versions, taking Alan to an even higher enjoyment
dimension.
These
magnificent little DC motors are only 120w (rated to 12 amps
continuous) and are coupled to a 28:1 reduction gearbox which is
close coupled via a stainless steel shaft to the gear shaft of a 5:1
braking winch.
For the
more elderly, the more feminine, or those simply not caring to crank
on the handle of a manual winch these babies are the
answer.
And as of
17th Oct. 2003 Alan has moved into the "luxury" bracket - the manual
winch was removed and replaced with one of the fantastic little 12v
DC motorised versions, taking Alan to an even higher enjoyment
dimension.
These
magnificent little DC motors are only 120w (rated to 12 amps
continuous) and are coupled to a 28:1 reduction gearbox which is
close coupled via a stainless steel shaft to the gear shaft of a 5:1
braking winch.
For the
more elderly, the more feminine, or those simply not caring to crank
on the handle of a manual winch these babies are the
answer.
 The tower
of Greg - VK4AML - originally built for a great old ham (VK4VI -sk)
in 1986 and modified by Greg with a new slide carriage/rotator mount
strongback from todays versions. An "old-timer" still doing a great
job.
Greg shows
just what is possible with some thought and effort.
The tower
of Greg - VK4AML - originally built for a great old ham (VK4VI -sk)
in 1986 and modified by Greg with a new slide carriage/rotator mount
strongback from todays versions. An "old-timer" still doing a great
job.
Greg shows
just what is possible with some thought and effort.
 .........
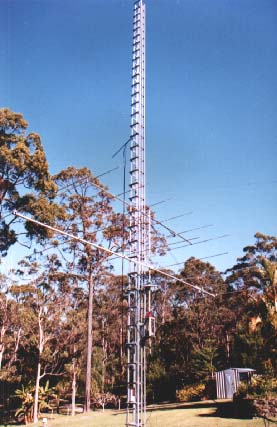
 Here is
Bob - VK4CPM - with his shiny new 20m tower. Antenna is 9el HF (13 -
30MHz.) Log Periodic made by ATN.
Note here
how the antenna strongback/rotator mount tilts outward to facilitate
loading the antenna onto the mast. Make no mistake this is a large
antenna that takes a bit of handling - ask Bob how easy it was to
install compared to the previous tower he had it on. There is a
picture of it on my homepage with the antenna fully
raised.
Here is
Bob - VK4CPM - with his shiny new 20m tower. Antenna is 9el HF (13 -
30MHz.) Log Periodic made by ATN.
Note here
how the antenna strongback/rotator mount tilts outward to facilitate
loading the antenna onto the mast. Make no mistake this is a large
antenna that takes a bit of handling - ask Bob how easy it was to
install compared to the previous tower he had it on. There is a
picture of it on my homepage with the antenna fully
raised.
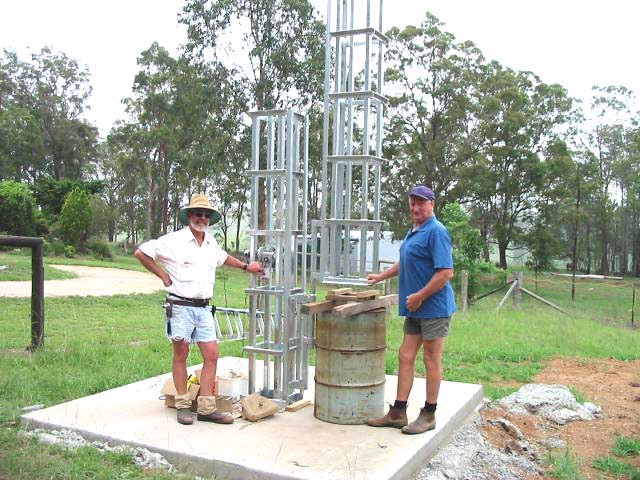 Here is
VK4KAD - Ian with John VK4JB erecting a 20m tower. If you saw a red
200l drum in the photos of Bob Becks tower and wondered what it was
for - well wonder no longer. The drum is used to rest the sections on
while the self erecting jig is located at the bottom of the section
being raised - this allows the section to turn into position over the
standing section.
(PS. John
does not have a deformity - he sucked in his gut for the pic hi
hi)
Here is
VK4KAD - Ian with John VK4JB erecting a 20m tower. If you saw a red
200l drum in the photos of Bob Becks tower and wondered what it was
for - well wonder no longer. The drum is used to rest the sections on
while the self erecting jig is located at the bottom of the section
being raised - this allows the section to turn into position over the
standing section.
(PS. John
does not have a deformity - he sucked in his gut for the pic hi
hi)
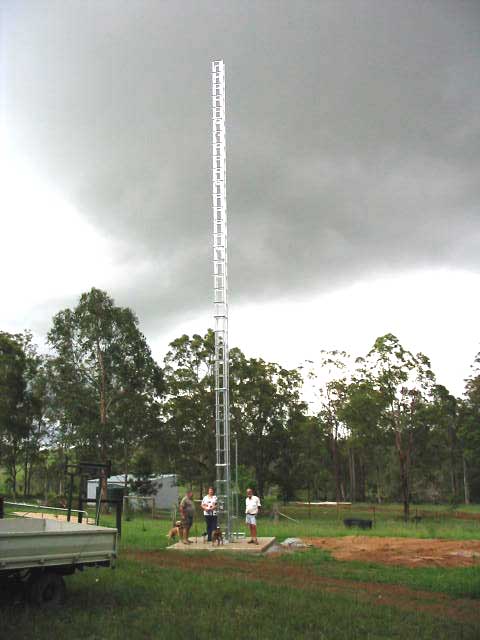 In spite
of "Murphy" nagging over my shoulder all day the tower was up and the
cold beer enjoyed by 1700hrs (after a slow and tardy start) - a nasty
storm was about to hit. VK4TB and his lovely partner came into shot
with Ian.
In spite
of "Murphy" nagging over my shoulder all day the tower was up and the
cold beer enjoyed by 1700hrs (after a slow and tardy start) - a nasty
storm was about to hit. VK4TB and his lovely partner came into shot
with Ian.
 Ray VK2VA
the "mountin' man" from bushranger country - 17.5m at Walcha NSW. I
must say one gets a fantastic view of the beautiful little town of
Walcha from the top of Rays tower - and not a bad view from inside
his shack either.
Listen for
a big noise from this bloke once he hoists up his Force 12 multi-band
beam.
Hams
around the world have bought and are using the One Man Tower - sure
there have been some minor glitches, and there will probably be some
more as time goes by - but ever continuing research and development
makes the One Man Tower the most sought after tower in the world.
Now in its
Mk. 9 version the towers offer a level of user friendliness that
other manufacturers wish they had.
20 years
in service and still going strong.
Late
addition - here are some more descriptive photos of the key to the
One Man Tower - the simple but super effective slide carriage system
(warning it is subject to a pending patent and all material is
copyright of Kevin D. Peacock)
Ray VK2VA
the "mountin' man" from bushranger country - 17.5m at Walcha NSW. I
must say one gets a fantastic view of the beautiful little town of
Walcha from the top of Rays tower - and not a bad view from inside
his shack either.
Listen for
a big noise from this bloke once he hoists up his Force 12 multi-band
beam.
Hams
around the world have bought and are using the One Man Tower - sure
there have been some minor glitches, and there will probably be some
more as time goes by - but ever continuing research and development
makes the One Man Tower the most sought after tower in the world.
Now in its
Mk. 9 version the towers offer a level of user friendliness that
other manufacturers wish they had.
20 years
in service and still going strong.
Late
addition - here are some more descriptive photos of the key to the
One Man Tower - the simple but super effective slide carriage system
(warning it is subject to a pending patent and all material is
copyright of Kevin D. Peacock)
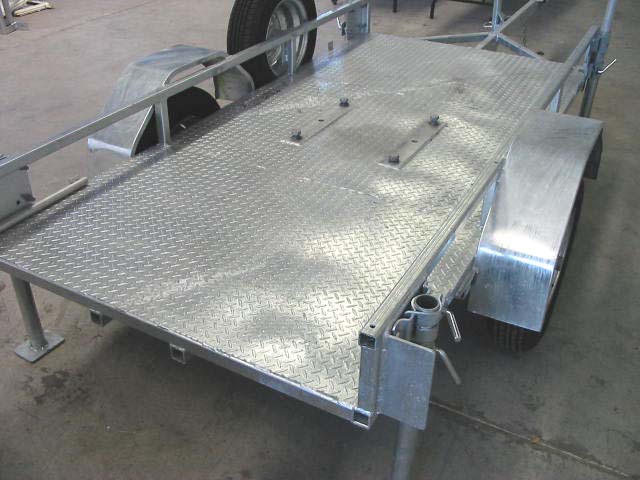 For the
purpose of this exercise I am using the OMT Demo trailer to
demonstrate the erecting of the OMT - and the tray of my little truck
will serve as the ground in front of the tower;-)
For the
purpose of this exercise I am using the OMT Demo trailer to
demonstrate the erecting of the OMT - and the tray of my little truck
will serve as the ground in front of the tower;-)
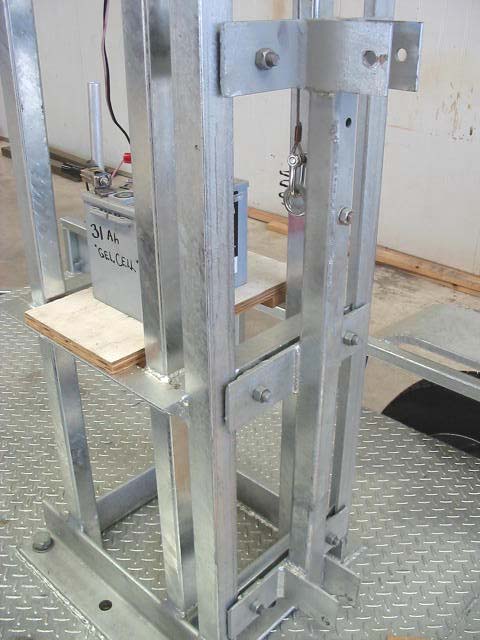
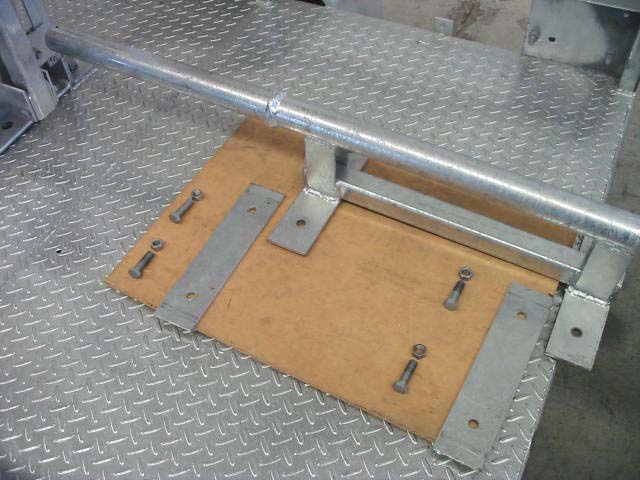
 Here are
the two sections I will use in this demo. The base section is stood
up - you would of course position it over the hold-down bolts that
you cast into your base pad footing - taking care not to damage the
threads.
Here are
the two sections I will use in this demo. The base section is stood
up - you would of course position it over the hold-down bolts that
you cast into your base pad footing - taking care not to damage the
threads.
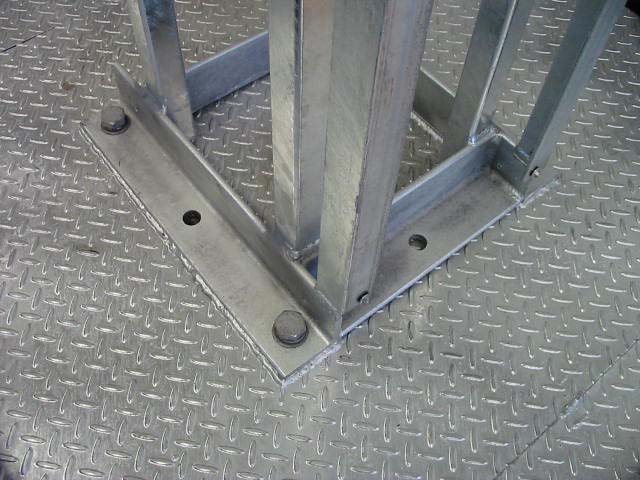 On the
demo trailer four bolts suffice - in real life you will secure the
section with eight hold-down bolts.
On the
demo trailer four bolts suffice - in real life you will secure the
section with eight hold-down bolts.
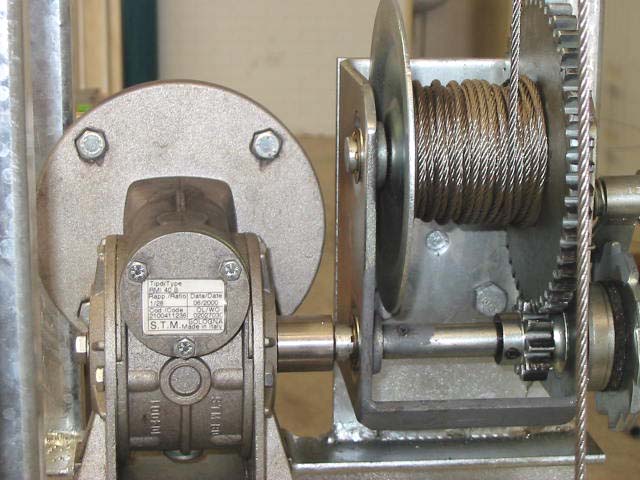 Then you
will fit your winch and the electric motor if you have opted for it.
Load the wire onto the winch - under tension BUT DO NOT WRAP IT
AROUND GLOVED HANDS AND LET IT SLIDE THROUGH YOUR HAND AS THIS WILL
PROMOTE ONE SIDE OF THE WIRE AHEAD OF THE OTHER AND IT WILL KINK. The
wire must be allowed to swivel as it loads.
Then you
will fit your winch and the electric motor if you have opted for it.
Load the wire onto the winch - under tension BUT DO NOT WRAP IT
AROUND GLOVED HANDS AND LET IT SLIDE THROUGH YOUR HAND AS THIS WILL
PROMOTE ONE SIDE OF THE WIRE AHEAD OF THE OTHER AND IT WILL KINK. The
wire must be allowed to swivel as it loads.
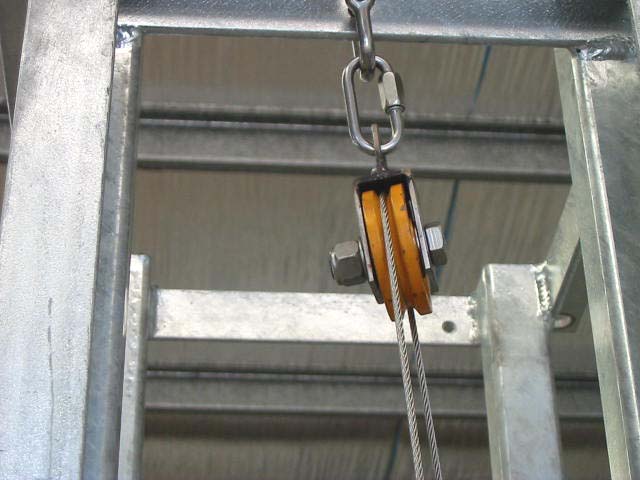 Fit the
pulley to the top of the section at the hole provided. The sheave can
be removed and refitted after you place the wire inside. Then run the
wire down the outside of the tower and attach it to the slide
carriage....
Fit the
pulley to the top of the section at the hole provided. The sheave can
be removed and refitted after you place the wire inside. Then run the
wire down the outside of the tower and attach it to the slide
carriage....
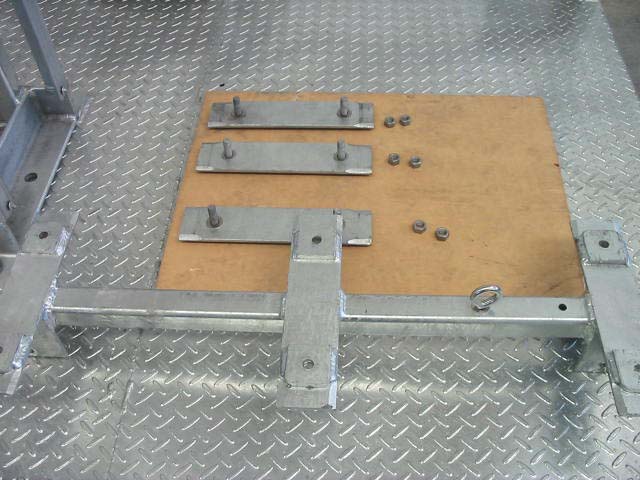 Which you
have laid out ready at the foot of the tower. Note the stainless
steel eyebolt - it must be positioned in the second hole from the top
of the slide carriage for the erection process. (hmmm that was not
intended to sound like that)
Which you
have laid out ready at the foot of the tower. Note the stainless
steel eyebolt - it must be positioned in the second hole from the top
of the slide carriage for the erection process. (hmmm that was not
intended to sound like that)
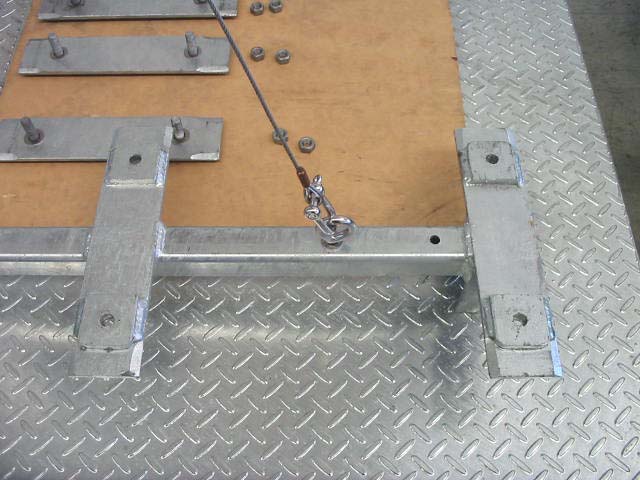 Attach the
wire to the eye bolt.
Attach the
wire to the eye bolt.
 Raise the
slide carriage using your winch and attach it to the slide tracks
using the three cheek plates with matching bevels.
Raise the
slide carriage using your winch and attach it to the slide tracks
using the three cheek plates with matching bevels.
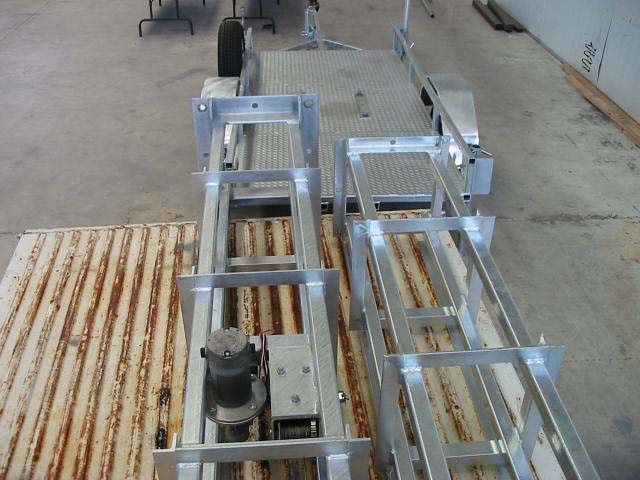
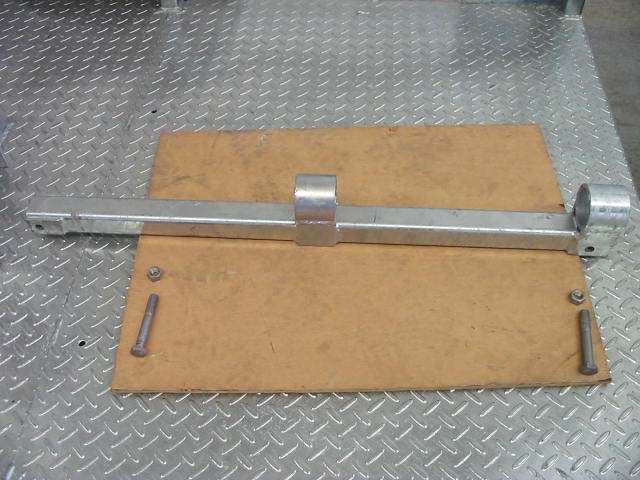 Next make
ready the self erecting jig socket.
Next make
ready the self erecting jig socket.
 Place the
bottom of the socket into the lower position of the slide carriage -
insert bolt and secure with nut.
Place the
bottom of the socket into the lower position of the slide carriage -
insert bolt and secure with nut.
 Raise the
top of the socket and secure it in position at the top of the slide
carriage.
Raise the
top of the socket and secure it in position at the top of the slide
carriage.
 Now you
can test the functioning of the slide carriage as there will be
enough weight now to make the brake work on the braking winch.
Wind it up
and down a few times to get a feel for it and to check that the slide
tracks have not been knocked from their factory settings during
transit.
If they
have you will need to fine tune them so that the slide carriage
travels smoothly along the tracks.
It is a
good idea to actually test the slide carriage on the sections when
they are first delivered and laying on the ground - you will be able
to detect any tight spots and deal with them far easier than when you
have them 40' off the ground.
Now you
can test the functioning of the slide carriage as there will be
enough weight now to make the brake work on the braking winch.
Wind it up
and down a few times to get a feel for it and to check that the slide
tracks have not been knocked from their factory settings during
transit.
If they
have you will need to fine tune them so that the slide carriage
travels smoothly along the tracks.
It is a
good idea to actually test the slide carriage on the sections when
they are first delivered and laying on the ground - you will be able
to detect any tight spots and deal with them far easier than when you
have them 40' off the ground.
 The moment
of truth draws near - bring the self erecting jig to the tower base -
note that the cheek plates have no beveled edges. Also you will note
that the spacer is only 5mm - this will give enough friction clamping
force to hold the sections as they are raised into
position.
The moment
of truth draws near - bring the self erecting jig to the tower base -
note that the cheek plates have no beveled edges. Also you will note
that the spacer is only 5mm - this will give enough friction clamping
force to hold the sections as they are raised into
position.
 Insert the
slewing pipe stem of the self erecting jig into the slewing slew
tubes of the socket, check that the jig slews easily in the sockets -
DO NOT USE GREASE.
Insert the
slewing pipe stem of the self erecting jig into the slewing slew
tubes of the socket, check that the jig slews easily in the sockets -
DO NOT USE GREASE.
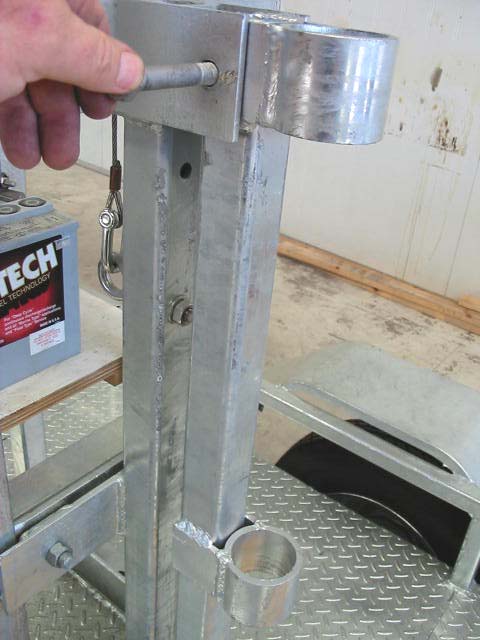
 Stand the
next section and bring it to the cheek plates of the self erecting
jig.
Stand the
next section and bring it to the cheek plates of the self erecting
jig.
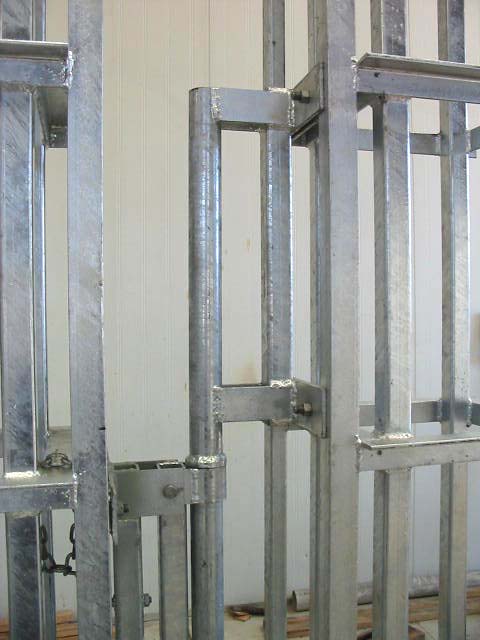 Clamp the
section into the self erecting jig - the cheek plates will clamp
tightly to the slide tracks - the top cheek plate only needs firm
finger tight but the lower should be taken up sensibly with a spanner
- they do not need to be tightened excessively.
Once you
have the section clamped up, raise it approx 1m off the ground. You
will now need to place an empty 200lt drum or similar under the foot
of the section - some wood may be required to pack up the right
amount.
This must
be done in order to let the self erecting jig slide back down to the
bottom of the section where it is to be clamped for the final lifting
of each new section - think about it and you will understand why this
must be done.
Clamp the
section into the self erecting jig - the cheek plates will clamp
tightly to the slide tracks - the top cheek plate only needs firm
finger tight but the lower should be taken up sensibly with a spanner
- they do not need to be tightened excessively.
Once you
have the section clamped up, raise it approx 1m off the ground. You
will now need to place an empty 200lt drum or similar under the foot
of the section - some wood may be required to pack up the right
amount.
This must
be done in order to let the self erecting jig slide back down to the
bottom of the section where it is to be clamped for the final lifting
of each new section - think about it and you will understand why this
must be done.
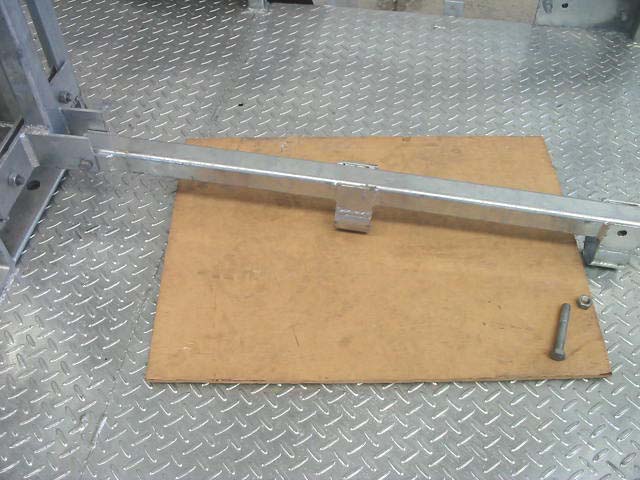
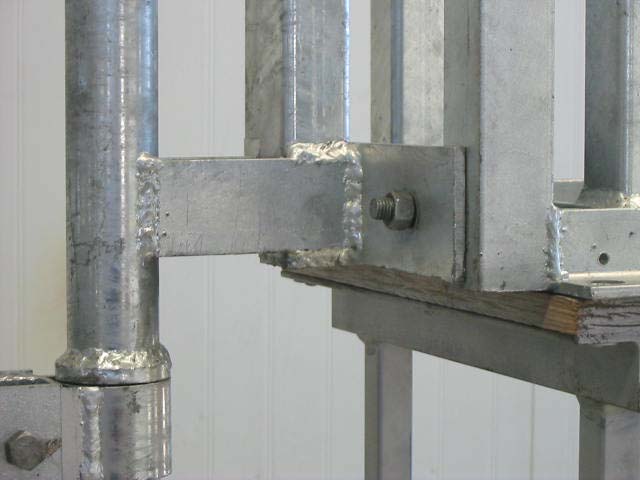 This is
how the self erecting jig lower cheek plate and the bottom of the
slide track of each new section should be mated.
This is
how the self erecting jig lower cheek plate and the bottom of the
slide track of each new section should be mated.
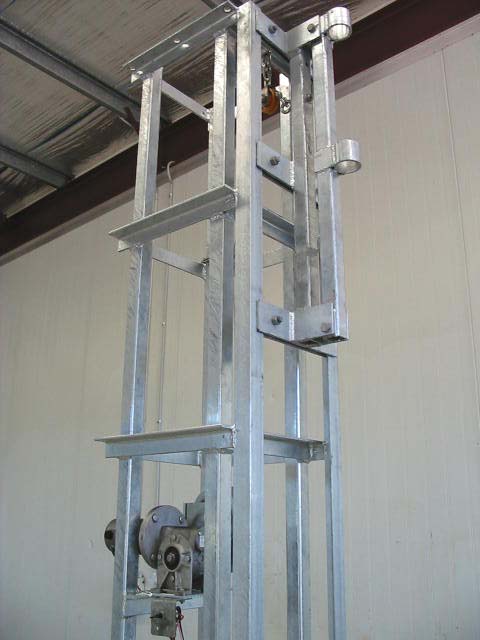
 The
section can now be taken to the top of the tower.
The
section can now be taken to the top of the tower.
 Raise it
until it is clear of the top of the standing tower
sections.
Raise it
until it is clear of the top of the standing tower
sections.
 And rotate
it into position over the top of the standing section.
Unfortunately I ran out of room in the factory and
could not fully rotate it - so be patient with me and I will continue
the story when I take the trailer outside - I might even wait until I
take it to the next Hamfest and finish the shoot there.
In the
meantime - thank you for joining me and the worlds best Ham Radio
tower - we enjoyed having you.
And rotate
it into position over the top of the standing section.
Unfortunately I ran out of room in the factory and
could not fully rotate it - so be patient with me and I will continue
the story when I take the trailer outside - I might even wait until I
take it to the next Hamfest and finish the shoot there.
In the
meantime - thank you for joining me and the worlds best Ham Radio
tower - we enjoyed having you.
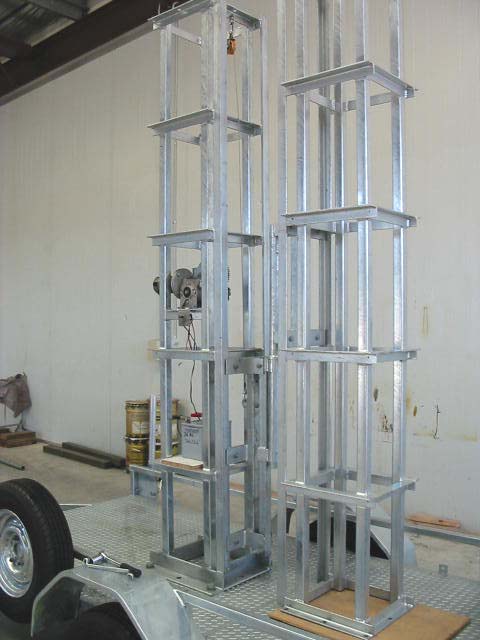
 And here
is the demo tower fully deployed - one of the fantastic side benefits
is that it also serves as a portable station for field days - here
VK4MR is working stations from "Jollies Lookout" to the Northwest of
Brisbane City.
Antennas
used here were a 17el Logcell yagi on 2m and a 17el Logcell yagi on
70cm. We had a fantastic area of working coverage and the magnificent
bushland setting and view more than compensated for the miserably
poor response from our fellow hams on UHF/VHF (we made only 21
contacts in the full days working - a sad indictment of the interest
in Amateur radio unfortunately)
During the
time we spent at the location we were continually approached by
curious tourists and sightseers - at least THEY were interested in
Amateur radio hi hi!!!!!!
73s
and stay well.
Safe radio
doesn't mean sticking a condom over your microphone - although when I
listen to some of the airwaves content nowadays it may not be such a
bad idea - without CW it's just CB hi hi................
Home
email -
aeitower@spin.net.au
Mob. phone
0414 254 080
Rate
this site @ dxzone.com
And here
is the demo tower fully deployed - one of the fantastic side benefits
is that it also serves as a portable station for field days - here
VK4MR is working stations from "Jollies Lookout" to the Northwest of
Brisbane City.
Antennas
used here were a 17el Logcell yagi on 2m and a 17el Logcell yagi on
70cm. We had a fantastic area of working coverage and the magnificent
bushland setting and view more than compensated for the miserably
poor response from our fellow hams on UHF/VHF (we made only 21
contacts in the full days working - a sad indictment of the interest
in Amateur radio unfortunately)
During the
time we spent at the location we were continually approached by
curious tourists and sightseers - at least THEY were interested in
Amateur radio hi hi!!!!!!
73s
and stay well.
Safe radio
doesn't mean sticking a condom over your microphone - although when I
listen to some of the airwaves content nowadays it may not be such a
bad idea - without CW it's just CB hi hi................
Home
email -
aeitower@spin.net.au
Mob. phone
0414 254 080
Rate
this site @ dxzone.com